Configure a USB flash drive to be a Windows 7 installation platform
Requirements
Of course, in order to employ this technique you’ll need a USB flash drive that is big enough to hold the contents of the Windows 7 DVD. The Windows 7 RC DVD is about 2.5GB, and you can expect that the RTM DVD will be at least that if not more. For my test system I am using a 4GB USB flash drive.
Keep in mind that the procedure we will use will completely reformat the USB flash drive. So you want to make sure that you back up any data that you have on the drive before you begin.
The systems on which you want to install Windows 7 via the USB flash drive have to be able to be configured to boot from a USB drive. Most new systems have the capability to boot from a USB flash drive, and the operation can usually be configured in the BIOS or by simply pressing a certain key during bootup. You’ll need to check your specific hardware in order to be sure.
Using the DiskPart utility
As you may know, the DiskPart utility is a command-line version of the Disk Management snap-in and is designed to allow you to manage disks, partitions, or volumes from within scripts or directly from a command prompt. We can use the DiskPart command in Windows Vista or in Windows 7 to configure a USB flash drive to be a bootable device. (Keep in mind that Windows XP’s DiskPart command is unable to create a bootable USB flash drive.)
To begin, connect your USB flash drive to a computer on which you will be preparing the drive. For my example, I’ll be using a Windows Vista system.
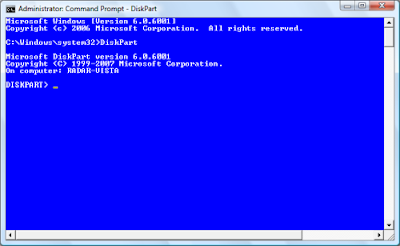
Now, locate the command Prompt shortcut on the Start menu, right-click on it, and select the Run as Administrator command. Then, respond appropriately to the UAC. You can now launch the DiskPart utility by typing DiskPart on the command line. You’ll then see the DISKPART prompt, as shown in Step 1.
Step 1
Now that you’re in the DiskPart environment, you’ll need to locate the USB flash drive using the List Disk command. As you can see in Step 2, the List Disk command has identified my USB flash drive as Disk 5. I can verify that my USB flash drive is indeed Disk 5 by checking the Size column, which lists the size as 3906MB, which is roughly 4GB.
Step 2
(If you have difficulty identifying your USB flash drive using the List Disk command, you can try the List Volume command, which will provide the drive letter as well as the label, both of which can help you to identify the drive.)
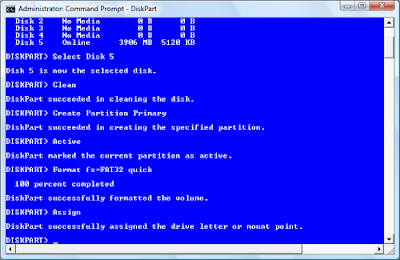
Once you identify the drive number of your USB flash drive, you will need to set the focus of the DiskPart environment on that disk. (This is an extremely important step–Make sure that you select the correct drive or you could accidentally destroy valuable data!) On my example, the USB flash drive is Disk 5, so I will use the command Select Disk 5, as shown in Step 3.
Step 3
Now that your USB flash drive has the focus, you need to remove all the partition or volume formatting information from the disk. To do that, you’ll use the Clean command. The Clean operation should occur rather quickly. When it is done, you will see a success message like the one shown in Step 4.
Step 4
You’ll now use the Create Partition Primary command to create a primary partition on the disk. After you create the partition, you will see a success message and the focus will automatically shift to the new partition. You’ll use the Active command to mark the partition as active, as shown in Step 5. Marking the partition as active will essentially allow the BIOS to recognize that the partition is a valid bootable system partition.
Step 5
With the partition created and active, you’re now ready to quickly format the drive and set up the FAT32 file system using the Format fs=FAT32 quick command. (While you could format the drive as NTFS, the typical way to format a USB flash drive is to use FAT32.) Once the drive is formatted, you’ll use the Assign command, as shown in Step 6, to allow the drive to be assigned a drive letter.
Step 6
The USB flash drive is now ready. At this point, you can use the Exit command to exit the DiskPart environment and then close the Command Prompt window.
Copying the Windows 7 files
Copying the Windows 7 files is easy. Just open Windows Explorer, access the Windows 7 DVD, select all the files and folders, and then drag and drop them on the USB flash drive icon, as shown in Step 7. Keep in mind that the copy operation will take a little while to complete.
Step 7
Installing Windows 7 from the USB flash drive
With the contents of the Windows 7 DVD on a bootable USB flash drive, installing the operating system is a snap. Just boot the system from the USB drive and the installation procedure will begin as it normally would, as shown in Step 8. However, the installation procedure will actually run quicker off a USB flash drive since it doesn’t contain any physically moving components.
Step 8
NOTE: When that's done, you're good to go. You should now be able to boot the appropriate PC using the USB and install Windows 7. However, most PCs will require you to interrupt the normal boot process and manually select the USB key as the boot disk. How you do this varies from PC to PC. You typically hit the key del, F2, F11, F12, or some other key. Consult your PC's documentation for the details.
Once the PC is booting from the USB key, Setup will work just like it does via a normal Setup DVD.


.jpg)


9 comments:
wow nice tutorial visit din po sa blog ko Entrepreneurial Recipe
Our Daily Bread
Out the Best in People
USB drives are the new floppy disks... my computer doesn't even have floppy disks anymore... great info for everyone...
Nice tutorial! I bookmarked it for future reference. I'll use my USB for deployment of a program. I guess, it would be on the same procedures..
I think no matter how simple the instructions are I won't be able to get it.. waaa low memory ako.. :( IT na lang po please, help!! :)
this is really helpful, though i still rely on my trusted computer technician to do these stuffs
This is very helpful I need this stuff! Thanks for sharing how to install Windows from usb.
This was a extremely fascinating post. I hope to find more such in the near future.i want to ask you that i am frustrated as fat virus is in my pendrive how to remove it...
This is very helpful tutorials,Please visit http://basiccomputerguide.blogspot.com
Friends, instated of this method you can use Windows 7 USB/DVD download tool for coping setup files and making USB bootable very easily in few automated steps...
Download link give below, software originally from Microsoft..
http://images2.store.microsoft.com/prod/clustera/framework/w7udt/1.0/en-us/Windows7-USB-DVD-tool.exe
Post a Comment